Login
Your link will open in a new tab
If this has not happened, please click here

As HR and Health & Safety professionals, we noticed a significant gap in the market, and more importantly employer’s knowledge of effective business administration and regulations, plus the need for businesses to digitalise the HR and Health & Safety management process.
 oneHR
oneHRRemove the HR management headache
oneSAFEMake Health & Safety compliance seamless
oneHR oneSAFE oneHR Back oneSAFE Back test BackIf this has not happened, please click here

This is a guide for Admins and Managers who are looking to add leave and/or absence for their employees.
Updated over a week ago
As an admin or manager, you have the ability to add leave and absence for employees that fall under your level of authority on oneHR.
To do this, start by heading into the Leave section from the main oneHR menu.
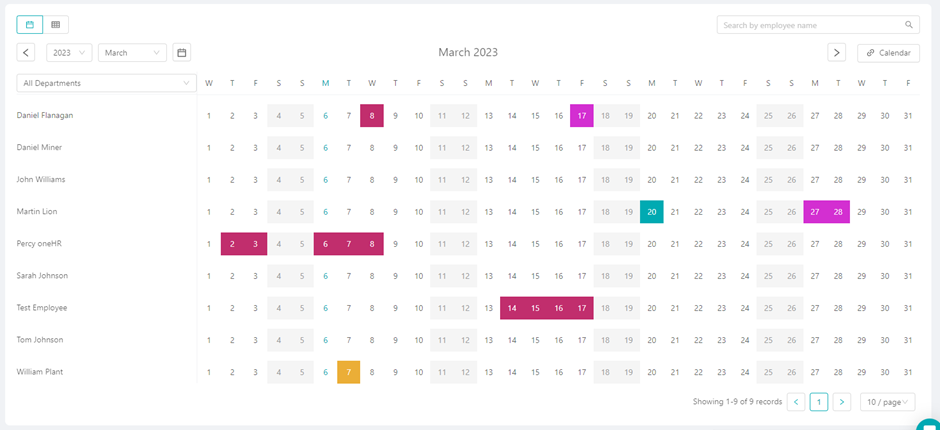
On the leave calendar, you will see a list of employees on the left and their corresponding leave in a row to the right.
To add a leave or absence record for an employee, start by clicking on the date that this leave or absence instance starts on.
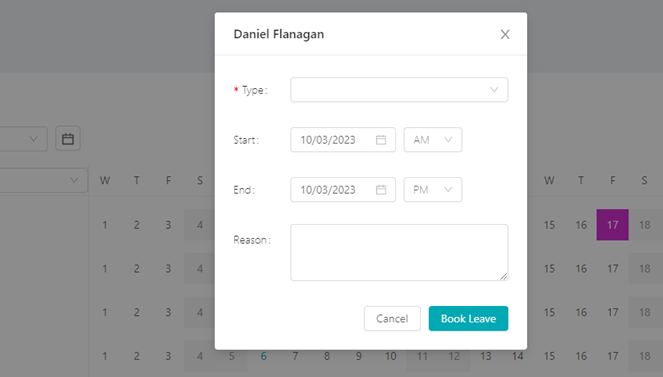
You will then be prompted to select a leave type (if you haven’t yet set up your leave types, you can find a guide on how to do so here), add a start and end date and if required/desired, enter a reason for this leave or absence.
Once you are happy with this information that has been entered, click on the ‘Book Leave’ button and this will now be assigned to this employee and added to the calendar.

May 12, 2023
On oneHR there are three types of access levels: Admin – The admin can oversee all employees and update their...
Read more about User Roles Explained
May 12, 2023
The announcements tool allows us to broadcast an on-system message to your entire workforce or just a selected department or...
Read more about Creating an Announcement
May 12, 2023
If for any reason you want to re-instate a user that has been archived. You can start this process by...
Read more about Re-adding an Archived User
May 15, 2023
To add a Custom Section on oneHR, start by clicking on the Admin option from the main left-hand side menu....
Read more about Creating a Custom Section